

Luci e musiche natalizie con Arduino per albero e presepe
Realizziamo un effetto natalizio con cinque LED che si accendono in sequenza mentre un buzzer riproduce cinque melodie. Il sistema può partire con un pulsante oppure funzionare automaticamente in modalità continua.
Video del progetto
Materiale necessario
🧰 Kit Arduino consigliato
Un kit completo è utile per avere breadboard, cavetti, resistenze, LED, pulsanti e molti altri componenti per sperimentare con Arduino.
👉 Guarda il kit Arduino consigliatoLink di affiliazione Amazon: in qualità di Affiliato Amazon ricevo un guadagno dagli acquisti idonei, senza alcun costo aggiuntivo per te.
📘 Vuoi imparare Arduino passo dopo passo?
Se vuoi approfondire e realizzare progetti più completi, puoi dare un’occhiata anche ai miei libri dedicati ad Arduino. All’interno troverai spiegazioni semplici, schemi chiari e molti progetti pratici pensati per chi parte da zero.
👉 Scopri i miei libri su ArduinoLink di affiliazione Amazon: in qualità di Affiliato Amazon ricevo un guadagno dagli acquisti idonei, senza alcun costo aggiuntivo per te.
Schema del circuito
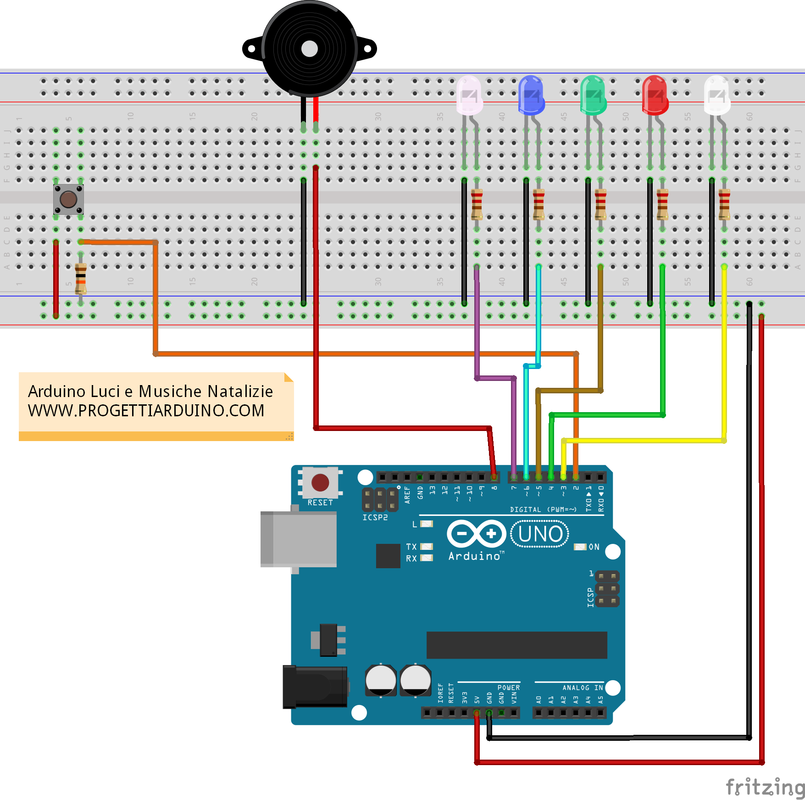
Schema del circuito con cinque LED, pulsante e buzzer. L’immagine mantiene una larghezza massima di 555 px.
Pin utilizzati
| Elemento | Pin Arduino |
|---|---|
| Pulsante | D2 |
| LED 1 | D3 |
| LED 2 | D4 |
| LED 3 | D5 |
| LED 4 | D6 |
| LED 5 | D7 |
| Buzzer | D8 |
Il file pitches.h
Lo sketch utilizza pitches.h, che contiene le definizioni delle frequenze associate alle note musicali. Il file deve trovarsi nello stesso progetto Arduino, in una seconda scheda dell’IDE oppure nella cartella dello sketch.
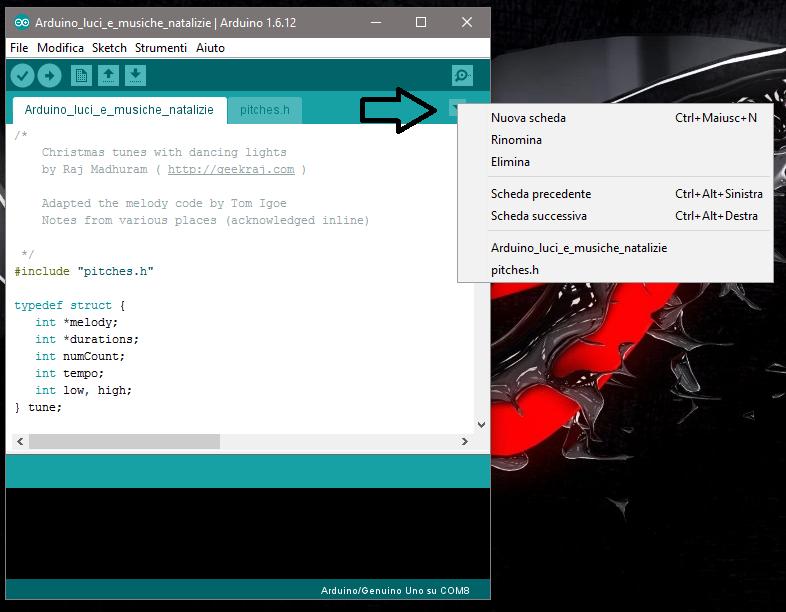
Aggiunta di una nuova scheda nell’IDE Arduino. L’immagine mantiene una larghezza massima di 619 px.
Le cinque melodie incluse
- Jingle Bells
- The First Noel
- O Holy Night
- We Three Kings
- What Child Is This
Per ogni brano sono presenti due array: uno contiene le note, l’altro le relative durate. La struttura tune permette allo sketch di gestire in modo uniforme tutte le melodie.
Codice Arduino completo
/*
  LUCI E MUSICHE NATALIZIE CON ARDUINO

  Collegamenti principali:
  - Pulsante: D2
  - 5 LED: D3, D4, D5, D6, D7
  - Buzzer: D8

  Modalità:
  continuousMode = 0 -> una melodia a ogni pressione del pulsante
  continuousMode = 1 -> riproduzione continua automatica

  Le frequenze delle note sono definite nel file pitches.h.
  Lo sketch contiene cinque melodie natalizie e diversi effetti luminosi.
*/

/*
    Christmas tunes with dancing lights
    by Raj Madhuram ( http://geekraj.com )

    Adapted the melody code by Tom Igoe
    Notes from various places (acknowledged inline)

 */
#include "pitches.h"

typedef struct {
   int *melody;
   int *durations;
   int numCount;
   int tempo;
   int low, high;
} tune;

tune tunes[5];

// Jingle Bells
int jingleBells[] = { N_E5, N_E5, N_E5, N_E5, N_E5, N_E5, N_E5, N_G5, N_C5, N_D5, N_E5,
                      N_F5, N_F5, N_F5, N_F5, N_F5, N_E5, N_E5, N_E5, N_E5, N_D5, N_D5, N_E5, N_D5, N_G5,
                      N_E5, N_E5, N_E5, N_E5, N_E5, N_E5, N_E5, N_G5, N_C5, N_D5, N_E5,
                      N_F5, N_F5, N_F5, N_F5, N_F5, N_E5, N_E5, N_E5, N_G5, N_G5, N_F5, N_D5, N_C5};
int jingleBellsDurations[] = { 4, 4, 8, 4, 4, 8, 4, 4, 4, 4, 16,
                               4, 4, 4, 4, 4, 4, 4, 4, 4, 4, 4, 4, 8, 8,
                               4, 4, 8, 4, 4, 8, 4, 4, 4, 4, 16,
                               4, 4, 4, 4, 4, 4, 4, 4, 4, 4, 4, 4, 16 };

// The first noel
// http://www.music-for-music-teachers.com/support-files/first-noel-broken-chord-stretch-key-of-c.pdf

int firstNoel[] = { N_E4, N_D4, N_C4, N_D4, N_E4, N_F4, N_G4, N_A4, N_B4, N_C5, N_B4, N_A4,
                    N_G4, N_A4, N_B4, N_C5, N_B4, N_A4, N_G4, N_A4, N_B4, N_C5, N_G4, N_F4,
                    N_E4, N_E4, N_D4, N_C4, N_D4, N_E4, N_F4, N_G4, N_A4, N_B4, N_C5, N_B4, N_A4,
                    N_G4, N_A4, N_B4, N_C5, N_B4, N_A4, N_G4, N_A4, N_B4, N_C5, N_G4, N_F4,
                    N_E4, N_E4, N_D4, N_C4, N_D4, N_E4, N_F4, N_G4, N_C5, N_B4, N_A4, N_A4,
                    N_G4, N_C5, N_B4, N_A4, N_G4, N_A4, N_B4, N_C5, N_G4, N_F4, N_E4
                  };

int firstNoelDurations[] = { 2, 2, 6, 2, 2, 2, 8, 2, 2, 4, 4, 4,
                             8, 2, 2, 4, 4, 4, 4, 4, 4, 4, 4, 4,
                             8, 2, 2, 6, 2, 2, 2, 8, 2, 2, 4, 4, 4,
                             8, 2, 2, 4, 4, 4, 4, 4, 4, 4, 4, 4,
                             8, 2, 2, 6, 2, 2, 2, 8, 2, 2, 8, 4,
                             12, 4, 4, 4, 4, 4, 4, 4, 4, 4, 8  };

// O Holy Night
// http://www.music-for-music-teachers.com/support-files/o-holy-night-lead-sheet-c.pdf

int oHolyNight[] = { N_E4, N_E4, N_E4, N_G4, N_REST, N_G4, N_A4, N_A4, N_F4, N_A4, N_C5,
                     N_G4, N_G4, N_E4, N_D4, N_C4, N_E4, N_F4, N_G4, N_F4, N_D4, N_C4,
                     N_E4, N_E4, N_E4, N_G4, N_REST, N_G4, N_A4, N_A4, N_F4, N_A4, N_C5,
                     N_G4, N_G4, N_FS4, N_E4, N_B4, N_G4, N_A4, N_B4, N_C5, N_B4, N_E4, N_REST, N_G4,
                     N_G4, N_A4, N_D4, N_G4, N_A4, N_G4, N_C5, N_E4, N_A4, N_G4, N_G4, N_G4, N_A4,
                     N_D4, N_G4, N_A4, N_G4, N_C5, N_E4, N_G4, N_C5, N_C5, N_B4, N_A4,
                     N_B4, N_A4, N_REST, N_A4, N_D5, N_D5, N_A4, N_A4, N_A4, N_C5,
                     N_C5, N_REST, N_C5, N_E5, N_D5, N_D5, N_G4, N_C5, N_C5, N_B4, N_A4,
                     N_G4, N_G4, N_G4, N_A4, N_G4, N_G4, N_G4, N_C5, N_D5,
                     N_D5, N_G4, N_E5, N_E5, N_D5, N_C5, N_B4, N_C5, N_D5,
                     N_C5 };

int oHolyNightDurations[] = { 6, 4, 2, 8, 2, 2 , 4, 2, 4, 2, 12,
                              4, 2, 4, 2, 6, 4, 2, 6, 4, 2, 24,
                              6, 4, 2, 8, 2, 2 , 4, 2, 4, 2, 12,
                              4, 2, 4, 2, 6, 4, 2, 6, 4, 2, 20, 2, 2,
                              6, 6, 6, 6, 4, 2, 4, 2, 6, 4, 2, 6, 6,
                              6, 6, 4, 2, 4, 2, 12, 12, 6, 4, 2,
                              12, 8, 2, 2, 12, 4, 2, 4, 2, 12,
                              8, 2, 2, 12, 8, 2, 2, 12, 6, 4, 2,
                              12, 4, 2, 4, 2, 12, 6, 6, 12,
                              6, 6, 12, 6, 6, 12, 6, 4, 2,
                              24 };

// http://www.christmas-carol-music.org/Lead_Sheets/WeThreeKings.html

int weThreeKings[] = { N_B4, N_A4, N_G4, N_E4, N_FS4, N_G4, N_FS4, N_E4,
                       N_B4, N_A4, N_G4, N_E4, N_FS4, N_G4, N_FS4, N_E4,
                       N_G4, N_G4, N_G4, N_A4, N_A4, N_B4, N_B4, N_D5, N_C5, N_B4,
                       N_A4, N_B4, N_A4, N_G4, N_FS4, N_E4,
                       N_FS4, N_A4, N_G4, N_G4, N_G4, N_D4, N_G4, N_E4, N_G4, N_G4, N_G4, N_G4, N_D4, N_G4, N_E4, N_G4,
                       N_G4, N_G4, N_A4, N_B4, N_C5, N_B4, N_A4, N_B4, N_G4, N_G4, N_G4, N_D4, N_G4, N_E4, N_G4 };

int weThreeKingsDurations[] = { 4, 2, 4, 2, 2, 2, 2, 6,
                                4, 2, 4, 2, 2, 2, 2, 6,
                                2, 2, 2, 4, 2, 4, 2, 2, 2, 2,
                                2, 2, 2, 4, 2, 6,
                                6, 6, 4, 2, 4, 2, 4, 2, 6, 4, 2, 4, 2, 4, 2, 6,
                                4, 2, 4, 2, 4, 2, 4, 2, 4, 2, 4, 2, 4, 2, 6  };

// What child is this
// http://www.free-scores.com/PDF_EN/traditional-what-child-is-this-39593.pdf

int whatChild[] = { N_E4, N_G4, N_A4, N_B4, N_C5, N_B4, N_A4, N_FS4, N_D4, N_E4, N_FS4, N_G4, N_E4, N_E4, N_DS4, N_E4, N_FS4, N_B3, N_REST,  N_E4,
                    N_G4, N_A4, N_B4, N_C4, N_B4, N_A4, N_FS4, N_D4, N_E4, N_FS4, N_G4, N_FS4, N_E4, N_DS4, N_CS4, N_D4, N_E4, N_E4, N_REST,
                    N_D5, N_D5, N_C5, N_B4, N_A4, N_FS4, N_D4, N_E4, N_FS4, N_G4, N_E4, N_E4, N_DS4, N_E4, N_FS4, N_DS4, N_B3, N_REST,
                    N_D5, N_D5, N_C5, N_B4, N_A4, N_FS4, N_D4, N_E4, N_FS4, N_G4, N_FS4, N_E4, N_DS4, N_CS4, N_D4, N_E4, N_E4} ;

int whatChildDurations[] = { 2, 4, 2, 3, 1, 2, 4, 2, 3, 1, 2, 4, 2, 3, 1, 2, 6, 2, 2, 2,
                             4, 2, 3, 1, 2, 4, 2, 3, 1, 2, 3, 1, 2, 3, 1, 2, 6, 4, 2,
                             6, 3, 1, 2, 4, 2, 3, 1, 2, 4, 2, 3, 1, 2, 4, 2, 4, 2,
                             6, 3, 1, 2, 4, 2, 3, 1, 2, 3, 1, 2, 3, 1, 2, 6, 4};

const int buttonPin = 2;     // the number of the pushbutton pin
int buttonState = 0;
int toneNum = 0;
int randomOffset = 0;
int outputStartPin = 3;
int continuousMode = 0;

void play(int tuneNum) {

  randomOffset = random(32);

  int numNotes = tunes[tuneNum].numCount;
  int tempo = tunes[tuneNum].tempo;
  for (int thisNote = 0; thisNote < numNotes; thisNote++) {

    int freq = tunes[tuneNum].melody[thisNote]*2;
    int noteDuration = tempo*tunes[tuneNum].durations[thisNote];

    if (freq > 0) {
       int n = (map(freq, tunes[tuneNum].low, tunes[tuneNum].high, 1, 31) + randomOffset)%31 + 1;
       lightsUp(n);
       tone(8, freq, noteDuration);

    } else {
       // REST
       delay(noteDuration);
    }

    delay(noteDuration);
    blankLights();

    // to distinguish the notes, set a minimum time between them.
    // the note's duration + 30% seems to work well:
    int pauseBetweenNotes = noteDuration * 0.30;
    delay(pauseBetweenNotes);

    noTone(8);

  }
}

void lightSweep(int k, int nBits) {
  for (int i=0; i<5; i++) {
    lightsUp(k);
    delay(50);
    k = k<<1;
    blankLights();
    delay(20);
  }

  k = k>>nBits;

  for (int i=0; i<5; i++) {
    lightsUp(k);
    delay(50);
    k = k>>1;
    blankLights();
    delay(20);
  }
}

void fromCenter() {
  for (int i=0; i<2; i++) {
    lightsUp(4);
    delay(50);
    blankLights();
    delay(50);
  }

  for (int i=0; i<4; i++) {
    lightsUp(10);
    delay(50);
    blankLights();
    delay(50);
  }

  lightsUp(31);
  delay(100);
  blankLights();
}

void lightEffect(int n) {
  switch(n) {
     case 0: for (int i=0; i<2; i++) { lightSweep(1, 1); }
             break;

     case 1: for (int i=0; i<2; i++) { lightSweep(7, 2); }
             break;

     case 2: for (int i=0; i<2; i++) { lightSweep(5, 2); }
             break;

     case 3: for (int i=0; i<2; i++) { fromCenter(); }
             break;
  }
}

void lightsUp(int n) {
  int i = 0;
  while (n>0 && i<5) {
    if (n%2 == 1) {
      digitalWrite(outputStartPin+i, HIGH);
    } else {
      digitalWrite(outputStartPin+i, LOW);
    }
    n = n>>1;
    i++;
  }
}

void blankLights() {
  for (int i=0; i<5; i++) {
    digitalWrite(i+outputStartPin, LOW);
  }
}

void setup() {

  int numTunes = 5;

  tunes[0].melody = jingleBells;
  tunes[0].durations = jingleBellsDurations;
  tunes[0].numCount = sizeof(jingleBells)/sizeof(int);
  tunes[0].tempo = 60;

  tunes[1].melody = firstNoel;
  tunes[1].durations = firstNoelDurations;
  tunes[1].numCount = sizeof(firstNoel)/sizeof(int);
  tunes[1].tempo = 60;

  tunes[2].melody = oHolyNight;
  tunes[2].durations = oHolyNightDurations;
  tunes[2].numCount = sizeof(oHolyNight)/sizeof(int);
  tunes[2].tempo = 100;

  tunes[3].melody = weThreeKings;
  tunes[3].durations = weThreeKingsDurations;
  tunes[3].numCount = sizeof(weThreeKings)/sizeof(int);
  tunes[3].tempo = 100;

  tunes[4].melody = whatChild;
  tunes[4].durations = whatChildDurations;
  tunes[4].numCount = sizeof(whatChild)/sizeof(int);
  tunes[4].tempo = 100;

  for (int i=0; i<numTunes; i++) {
    int low = N_DS8;
    int high = 0;
    for (int j=0; j<tunes[i].numCount; j++) {
      int freq = tunes[i].melody[j];
      if (freq != 0 && freq<low) low = freq;
      if (freq>high) high = freq;
    }
    tunes[i].high = high;
    tunes[i].low = low;
  }

  // initialize the pushbutton pin as an input:
  pinMode(buttonPin, INPUT);

  for (int i=0; i<5; i++) {
     pinMode(outputStartPin + i, OUTPUT);
  }

}

void playTune() {
  int effectNum = random(4);
  lightEffect(effectNum);
  play(toneNum);
  toneNum = (toneNum+1)%5;
  lightEffect(effectNum);
}

void loop() {

  if (continuousMode) {
    playTune();
    delay(2000);

  } else {

    // read the state of the pushbutton value:
    buttonState = digitalRead(buttonPin);

    // check if the pushbutton is pressed.
    // if it is, the buttonState is HIGH:
    if (buttonState == HIGH) {
      playTune();
    }
  }

}
Come funziona il programma
1. Il pulsante avvia una melodia
Il pulsante è collegato al pin D2. Con continuousMode = 0, Arduino attende che il pulsante venga premuto prima di eseguire playTune().
2. Cinque LED consecutivi
La variabile outputStartPin = 3 indica il primo LED. Il programma configura quindi cinque uscite consecutive, da D3 a D7.
3. Il buzzer usa tone()
Le note vengono riprodotte sul pin D8 con tone(8, freq, noteDuration). Al termine di ogni nota viene chiamato noTone(8).
4. Luci sincronizzate con le note
Durante la riproduzione, la frequenza della nota viene trasformata in un valore usato da lightsUp(). In questo modo il pattern dei LED cambia insieme alla melodia.
5. Effetti luminosi
Le funzioni lightSweep(), fromCenter() e lightEffect() generano animazioni diverse prima e dopo ciascun brano.
6. Rotazione automatica delle melodie
La variabile toneNum viene incrementata dopo ogni esecuzione e riportata a zero dopo il quinto brano. In questo modo le cinque melodie vengono riprodotte ciclicamente.
Modalità continua senza pulsante
Se vuoi che Arduino riproduca automaticamente tutti i brani uno dopo l’altro, modifica:
int continuousMode = 0;in:
int continuousMode = 1;
Impostazione della modalità continua.
INPUT_PULLUP, invertendo però la logica di pressione nel programma.Come personalizzare le luci
Gli effetti vengono costruiti usando cinque bit, uno per ogni LED. Il valore passato a lightsUp() determina quali LED devono essere accesi. Puoi quindi creare nuove sequenze modificando o aggiungendo funzioni simili a lightSweep() e fromCenter().
Come aggiungere una nuova melodia
Per aggiungere un altro brano servono un array con le note, un array con le durate e una nuova voce nella struttura tunes. È importante che ogni nota abbia la propria durata corrispondente.
Debug rapido
- se il codice non compila, controlla che
pitches.hsia presente; - se il buzzer non suona, verifica il collegamento al pin D8;
- se un LED non si accende, controlla polarità e resistenza da 220 Ω;
- se il pulsante non avvia il brano, verifica il collegamento su D2 e la resistenza da 10 kΩ;
- se vuoi eliminare il pulsante, imposta
continuousMode = 1; - se le melodie risultano troppo lente o veloci, controlla i valori
tempoassociati ai brani.
Varianti del progetto
- utilizzare LED di colori differenti;
- aggiungere più effetti luminosi;
- pilotare una striscia LED tramite transistor o MOSFET adeguati;
- aggiungere un sensore di luce per attivare il sistema solo al buio;
- aggiungere un selettore per scegliere la melodia;
- avviare automaticamente la sequenza all’accensione;
- costruire una decorazione per albero, presepe o villaggio natalizio.
Cosa devi ricordare
- Il pulsante è su D2.
- I cinque LED occupano i pin da D3 a D7.
- Il buzzer è collegato a D8.
pitches.hcontiene le frequenze delle note.- Lo sketch include cinque melodie natalizie.
continuousMode = 1abilita la riproduzione continua.
Domande frequenti
Posso usare il progetto senza pulsante?
Sì. Imposta continuousMode = 1 e Arduino eseguirà automaticamente le melodie in sequenza.
Perché serve pitches.h?
Il file definisce i valori numerici delle frequenze delle note musicali richiamate dagli array delle melodie.
Posso collegare direttamente una striscia LED ai pin Arduino?
No, se richiede una corrente superiore a quella gestibile dai pin. In quel caso serve uno stadio di pilotaggio adeguato.
Posso cambiare le canzoni?
Sì. Devi sostituire o aggiungere gli array delle note e delle durate, mantenendo coerente la configurazione della struttura tunes.